The Philippines
I’ve been to the Philippines! – In april 2017 I continued discovering new parts of the world and decided to go to the Philippines (Kind of an idea I had with a friend a few months back when we both felt, we needed holidays in the middle of the night via whatsapp :D) . Unfortunately, I’m working so the amount of days I can take off are limited in number and by projects / deadlines. I squeezed in a few holidays around easter and managed to fly for 20 days. The Philippines are gigantic and have so much to offer. Now, after being there, the list of places I still want to see in the Philippines is even longer than before 😀 . We went straight to Malapascua and then to Palawan – which I tried to visualize here.
Diving the Philippines
 I was glad to get another chance to dive in Asia again. This time in the Philippines; more specifically in Malapascua, around El Nido and Port Barton in Palawan. Those were also the first ocean-dives for my dive-computer – which was really helpful for monitoring depth and RNT. Thanks to the divemate-app, I can now log all my dives on my smartphone, including a depth-profile (though I couldn’t afford an air-integrated dive-computer to see my air-consumption at different points through the dive and depth-levels, which might be really interesting). Anyway, I dived with four different dive-centers and all of them were awesome! I always had nice company and felt in good hands when crawling towards an eel garden or spotting thresher sharks. |
Ps: Just ignore the ‘Taken’-Date for the Canon Powershot Camera. It was a rental from a local dive-shop set to Jan 15th.
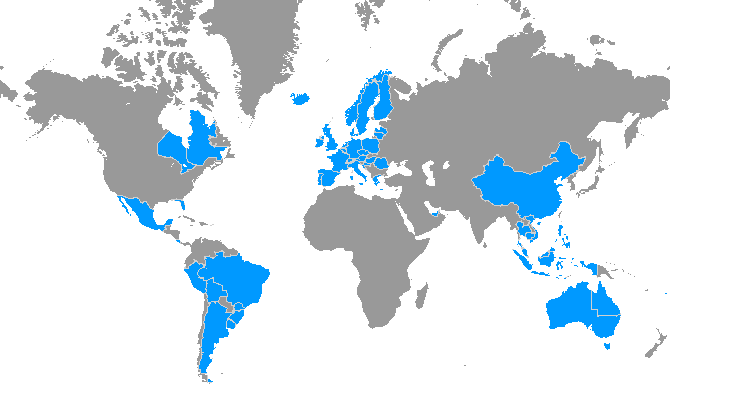
My scratch worldmap – I’ve been to 48+ countries!
I just updated my ‘scratch-map’ and made it more interactive with links to all posts:
To simplify it, I marked whole countries instead of regions – we all know it’s impossible to see all of a country.

- light blue: posted pictures from there
- dark blue: been there, no pictures though
- grey: haven’t been there yet
Building a smaller quadcopter
After my first experiences with a QAV250, I wanted to build something smaller and possibly foldable. I found a nice QAV180 frame which might work and started anew. This time, I had a faulty motor with some broken isolation resulting in smoke during the setup and a broken ESC which sometimes failed to start the motor unless given full throttle. After initial tries and a switch to BLHeli ESCs, I added an FPV camera and had some test-flights but calibration turned out to be really hard with a constant drift. I later figured out that one of the sticks on my 9XR remote had an abnormality: While moving straight along the Y-axis, it still showed some value-change to the X-axis as well in the form of a bump to the side reaching to about +15% near the 50% y-axis-setting but sticking to 0% for 0 or 100%.
FRAMED update!
I just extended my collection with 2 broken Phones, taken apart and framed 😉
1 & 2 see post
3) My old Nokia N95 which I used around 2007. One time, the Display broke and I had to replace it but the party ripped fcc wire shorted out some other components on the board which rendered it unusable.
4) My Samsung S4 Mini. At its time one of the few ‘Mini’ smartphones on the market – with the downsides of less capable hardware. It served me well for almost 2 years but shocked me a few times when the battery was entirely dischaged. The lack of a charging LED made it look like it was gone for good since it would only turn on after about 5 minutes of charging. One time, it really didn’t turn on anymore. No visible damage and even a new (swappable!) battery didn’T help. -> To the wall!
To be continued 😉 …
More LEDs, Igor! Give me more LEDs!
As if 720 RGB and 720 warmwhite LEDs* wasn’t enough for a living room… [* 2*12m Led strips on the walls] – I added a light-up table!
Back in 2007 the first of my friends moved out from their parents home and got her own appartment. We celebrated – and I gave her a color-changing lounge-table like the ones our favourite bar had. It was a simple, wooden 50*50 frame with 4 legs, an acrylic-glass top and a color-changing LED-lightbulb.
Years later, in 2017, I bought my first sofa creating the need for a coffee table. As a tribute to the ‘Schollenspiel’ we created the year before, I decided to go for a hexagonal table with LED-strips, similar to the 60 LED-‘ice-floes’. [article and pictures of the game will be added in the near future]
Here’s what the building process looks like:
The frame is composed of white cupboard-shelfes and outfitted with 3 legs and wheels. An extension cord enters through the bottom to connect the power supply. The LEDs are arranged on a wooden hexagon, soldered together and placed on top of the receiver and power supply. To avoid the visibility of individual LEDs, the acrylic glass is coverd with sticky foil and then placed on top of the wooden rests on each side. A plastic corner-cover keeps the ‘glass’ in place and ensures spilled coffee/beer won’t get to the electronics.
As you can see, the LED-strips I still had lying around had 2 different tones of blue – and the wifi-controller in the pictures isn’t Alexa compatible. I since replaced these LED strips to have a unified colorspace and put in a controller similar to the one powering my wall-LEDs.
The LEDs can be controlled via smartphone or voice-control via Alexa.
The last picture shows a hexagonal wall-mounted frame with a Tequila-hat on display. It’s based on a hexagonal tray I found in a store and omitts the acrylic glass. The ‘picture’ is thin black plastic stuck to sticky foil and the LED strip runs around the inner edge of the tray. I’ve built a few of these simplified, wifi controllable versions so far =).
Shopping list:
– ~6m RGB-LED-Strip
– a wifi-led-controller (magic home compatible)
– a 12V 60W power supply
– extension cord with in-line switch
– a hexagonal inner-plate for LEDs
– a hexagonal bottom-plate of wood
– a hexagonal 6mm acrylic glass top
– plastic corner-cover + silicone
– white sticky foil as diffusor
– six side-covers, 100mm high
– inner wooden rests for glass
– 3 legs with attached wheels
– screws, glue, metal-angles, wire & solder
PCB milling and pogo-pin adapters
A few years back I started the initiative to build an open electronics lab for students at my university. Some friends quickly came aboard and together we convinced institutes to share barely used equipment, companies to give us discounts and managed to win a price, giving us some cash to spend on awesome tools. Last year, the company LPKF kindly offered to lend us a professional PCB milling machine.
Since I moved to a different town for work, I haven’t had much time to play with it or work on projects in general, but here are a few PCBs I recently milled.
The pogo pin adapters will be the programming interface for coming ESP8266-based Boards. They feature 2mm-pitch pogo-pins with a X-XXX layout to ensure polarity and allow to program the board from top, edge or bottom.
Building a new PC
In 2004 some friends and I decided to build gaming PCs. Later, as a student, there was no way around a laptop. But now I decided a PC makes sense to replace my aged T420 which still works but lags a lot when trying to be productive. It also opens up the opportunity to focus on portability when replacing my T420 with some ~10-12″ tablet/laptop hybrid since the powerful machine is already there. The focus on bus-speeds (fast SSD, newest chipset, fast ram ) definetly paid off. Despite still missing a dedicaded graphics card, it puts my T420 to shame without breaking a sweat. Hardware definetly has become nicer to look at!